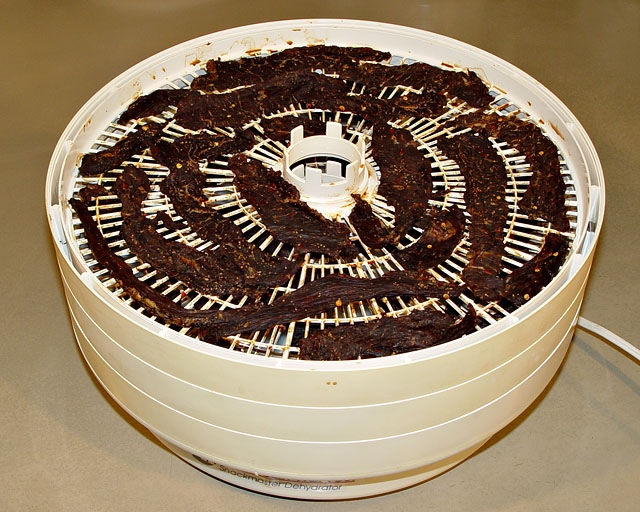
After you have allowed the meat strips to marinate in the spice mixture for a few hours, (or maybe overnight), you are ready to dry the meat into Jerky. Arrange the meat strips on the dehydrator trays. Make sure that the strips do not overlap or touch each other. Air must be able to flow all around each strip.
Follow the directions provided by your dehydrator manufacturer (they all vary somewhat) as to how many hours will be required to fully dry your Jerky. With my dehydrator I have found that I can start it up before I go to bed, and it is usually ready by the time I wake up in the morning. It's not a bad idea to schedule the drying over a week-end or when you don't need to leave to go to work, so that you can finish off the drying for a couple more hours if needed. The humidity in the air can affect the drying time. Here where I live, humidity varies a lot, so it's a good idea to pay attention to the humidity level in your area.
meat strips to marinate in the spice mixture for a few hours, (or maybe overnight), you are ready to dry the meat into Jerky. Arrange the meat strips on the dehydrator trays. Make sure that the strips do not overlap or touch each other. Air must be able to flow all around each strip.Follow the directions provided by your dehydrator manufacturer (they all vary somewhat) as to how many hours will be required to fully dry your Jerky. With my dehydrator I have found that I can start it up before I go to bed, and it is usually ready by the time I wake up in the morning. It's not a bad idea to schedule the drying over a week-end or when you don't need to leave to go to work, so that you can finish off the drying for a couple more hours if needed. The humidity in the air can affect the drying time. Here where I live, humidity varies a lot, so it's a good idea to pay attention to the humidity level in your area.
A tip: If you feel that your Jerky is almost dried enough, but not quite, you can place it into a paper sack, and place the sack into your refrigerator. It will continue to slowly dry for as long as you leave it in the paper sack in the frige. Maybe some of the thinner strips are just right, but the thicker ones need a little more drying time, try the paper sack tip for them.
Once you have removed the dried Jerky from the dehydrator you don't have to do anything special to package it. You may store it in a jar with a lid, or in a zip lock bag. You do not have to referigerate it, but I usually do if I have room for it. My thought is that it always pays to be careful. If you take the jar route, put a couple of tablespoons of uncooked rice in the jar to help keep the Jerky dry. Minute Rice works as well as raw rice, by the way. If you are going to take some Jerky with you for your outdoor activities, you may want to vacuum package a few before you throw it into your backpack. I have included a picture or two of packaging with the handy Food Saver. Label and date your packages. Be sure to take something with you to cut the package open, the plastic in the Food Saver bags is too strong to rip open with your hands like commercial packaging on the Jerky you get at the store.
Once you have removed the dried Jerky from the dehydrator you don't have to do anything special to package it.
You may store it in a jar with a lid, or in a zip lock bag. You do not have to referigerate it, but I usually do if I have room for it. My thought is that it always pays to be careful. If you take the jar route, put a couple of tablespoons of uncooked rice in the jar to help keep the Jerky dry. Minute Rice works as well as raw rice, by the way. If you are going to take some Jerky with you for your outdoor activities, you may want to vacuum package a few before you throw it into your backpack. I have included a picture or two of packaging with the handy Food Saver. Label and date your packages. Be sure to take something with you to cut the package open, the plastic in the Food Saver bags is too strong to rip open with your hands like commercial packaging on the Jerky you get at the store.

Enjoy trying many different flavors of your Home Made Beef Jerky.
2 comments:
These instructions are fantastic. I personally just throw 1/4 tsp of sodium nitrite (per lb) in with my marinade, but it is difficult to find. I like that you are advocating tender quick, safety is often neglected in jerky tuts.
Great resource!
I agree, this was a great recipe. I personally like exotic meats like deer and whatnot. I found some great recipes at http://beefjerkyrecipes.com/ for those jerky lovers looking for some other great recipe ideas.
Thanks for the article. Nice pics by the way!
Post a Comment